


Before You Start, You Will Need:
A Wise Agent account
A Facebook account that manages your Business Page
A Facebook lead ad form already created for your Page
A LeadSender account (new accounts get a 7-day free trial, no card needed. See LeadSender pricing for plans after the trial.)
What to Expect
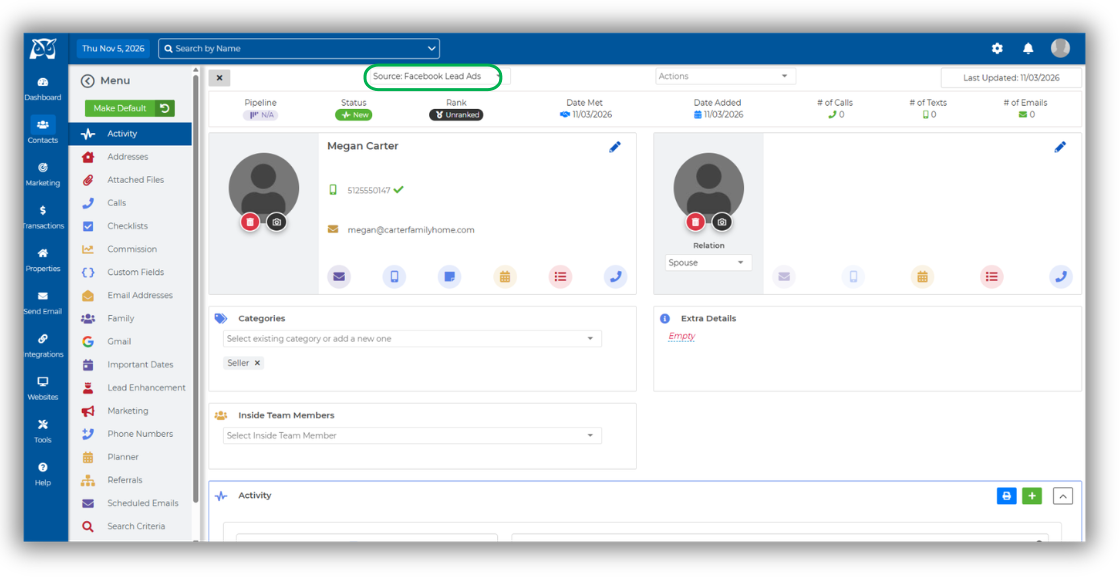
A new contact is added as soon as the form is submitted, with the name, email, phone, and address you matched.
Your lead source, status, rank, and categories are set on the contact.
Every form answer is saved as a note, so details like timeframe or price range are there when you call.
No duplicate contacts. If the person is already in Wise Agent, the new phone number or email is added to their existing contact.
Lead checking. LeadSender checks each email and phone number so obvious junk submissions are flagged.
Part 1: How to Set Up the Integration
Use the steps below to set up your integration to send Facebook and Instagram leads received from LeadSender to your Wise Agent CRM.
Step 1: Start your LeadSender trial and connect Facebook
Go to the Wise Agent sign-up link for LeadSender.
Create your account.
Sign in with the Facebook account that manages your Page.
Step 2: Choose the Wise Agent template
In LeadSender, go to Integrations.
Select Facebook Leads to Wise Agent.
Choose your Facebook Page and the lead form you want to send.
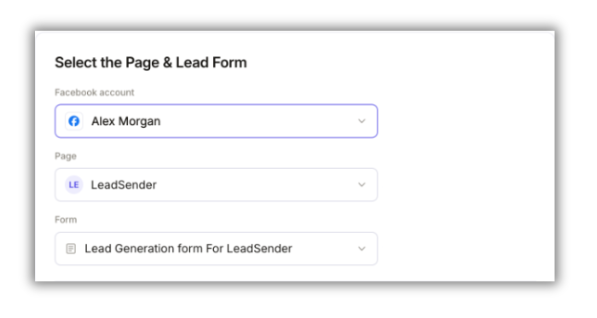
Step 3: Connect Wise Agent
In the Select or connect Wise Agent step, click Connect.
Wise Agent’s sign-in page opens. Sign in.
Choose the Team Member the leads belong to.
Click Allow.
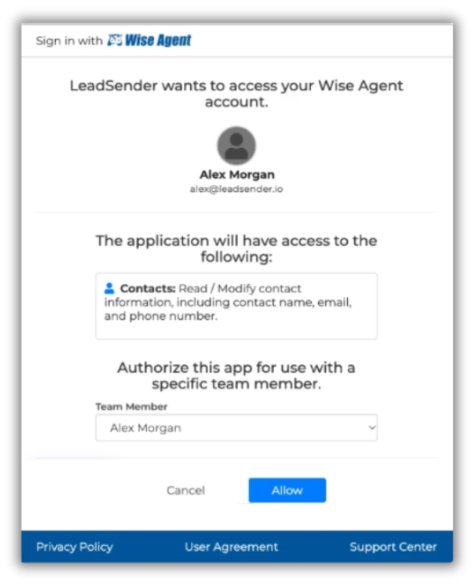
Good to know: LeadSender only gets access to your contacts. It never sees your Wise Agent password.
Step 4: Choose how leads are filed
Select the following. These lists come from your own Wise Agent account.
Lead source: Facebook Lead Ads, or one of your own
Contact status: the status new leads start with
Rank: the rank new leads start with
Categories: such as Buyer or Seller
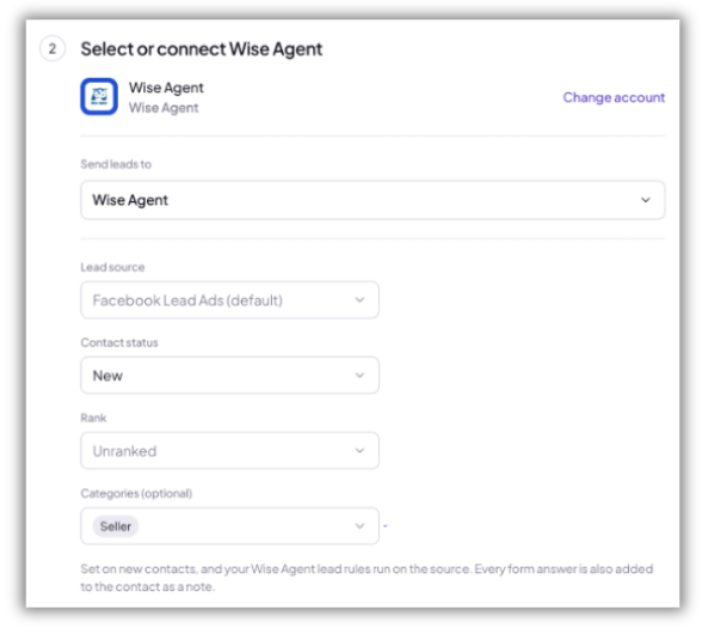
Step 5: Match your fields
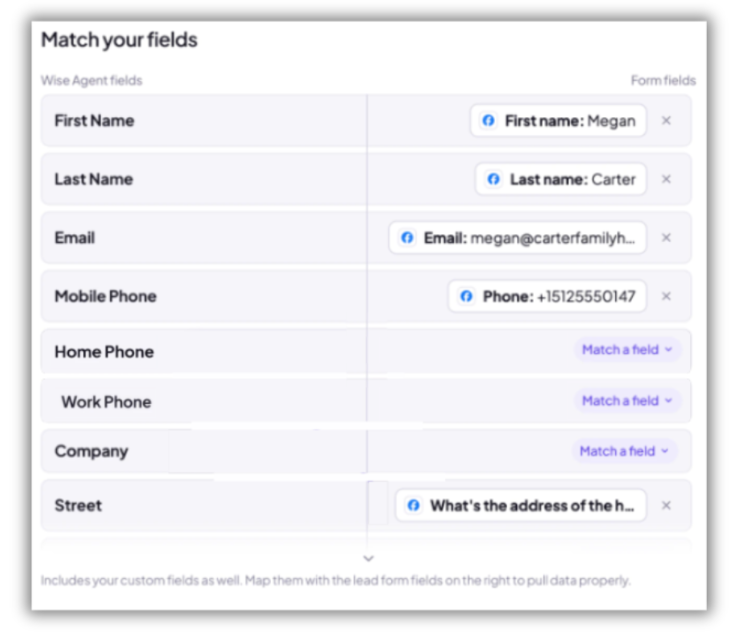
In Match your fields, Wise Agent’s contact fields are on the left and your form’s answers are on the right.
First name, last name, email, and phone are matched for you.
If your form asks for an address, select the answers for Street, City, State, and Zip.
Every other answer is saved on the contact as a note.
Step 6: Send a test lead and turn it on
Click Send a test lead. LeadSender sends your most recent real lead to Wise Agent.
Open the new contact in Wise Agent and check the details.
Want a brand new test lead? Create one with the free Meta Lead Ads Testing Tool.
When it looks right, click Turn on.
Part 2: Our Recommendations
Run one integration per form
Set up a separate integration for each lead form, and pick the category that fits the form.
Home valuation form: Seller category
New listings or home search form: Buyer category
This way each lead lands in the right list without anyone sorting it by hand.
Use a different lead source for each campaign
If you want Wise Agent’s lead rules to start a different drip campaign for each ad campaign, choose a different Lead source for each integration. For more details on how to set up lead rule automations for your Wise Agent leads, click HERE.
Set a starting status and rank
Choose a status and rank your team already uses, such as New, so leads are easy to find and follow up on right away.
Match the address fields on seller forms
If your form asks for the property address, match Street, City, State, and Zip so the address is on the contact and not only in the notes.
Troubleshooting
“Wise Agent access expired. Reconnect Wise Agent”: In LeadSender, click Change account, then Connect, and allow access again. Your integrations keep working once you reconnect.
The contact exists but the status or categories did not change: Status, rank, and categories are only set on new contacts. If the person is already in Wise Agent, their current status stays and the new phone, email, and answers are added.
Leads went to the wrong agent: The connection belongs to the Team Member you chose when you clicked Allow. Click Change account and reconnect with the right Team Member.
Nothing arrived: Make sure the integration is turned on, send a test lead, and check Run history in LeadSender for the reason.
Need Help?
LeadSender is a third-party service, so questions about your LeadSender account, billing, or Facebook connection go to their team through the LeadSender contact page.
For questions or help with your Wise Agent CRM, contact our award-winning Support Team 24/7 by phone at (480)836-0345 or by email at support@wiseagent.com